An infrared remote control is made using a NodeMCU ESP8266 and an infrared LED. With this from ioBroker on the MQTT protocol any device with an infrared receiver, eg: TV, Amplifier, SetTopBox, Air Conditioner, etc. controllable.
I’m not multiplying the word anymore, let’s see the circuit. All we need is
a NodeMCU ESP8266 and an Infrared LED .
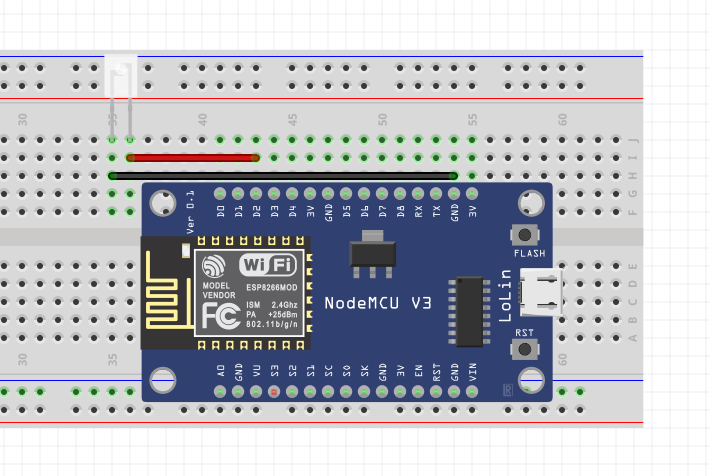
That’s it, it’s done quickly.
Now comes the Arduino sketch:
/****************************************************************/
//  http://myhomethings.eu
//  NodeMCU 1.0(ESP-12E Module)
//  Flash size: 4M (1M SPIFFS)
/****************************************************************/

#include <ESP8266WiFi.h>
#include <PubSubClient.h>
#include <IRremoteESP8266.h>
#include <IRsend.h>

const char* ssid = "SSID";
const char* password = "Password";
const char* mqtt_server = "192.168.xx.xx";  // The ioBroker Ip Address
int IrLed = D2;

WiFiClient espClient;
PubSubClient client(espClient);
IRsend irsend(IrLed);

void setup()
{
  WiFi.mode(WIFI_STA);
  WiFi.begin(ssid, password);
  while (WiFi.status() != WL_CONNECTED)
  {
    delay(500);
  }
  client.setServer(mqtt_server, 1883);
  client.setCallback(callback);
  irsend.begin();
}

void loop()
{
  if (!client.connected())
  {
    reconnect();
  }
  client.loop();
}

void callback(char* topic, byte* payload, unsigned int length)
{
  payload[length] = '\0';
  String strTopic = String(topic);
  String strPayload = String((char * ) payload);

  if(strTopic == "Infrared_topic")
  {
    if(strPayload == "false")
    {
      irsend.sendRC5(0x4C, 12); // you need to insert the appropriate IR code here
    }
    if (strPayload == "true")
    {
      irsend.sendRC5(0x4C, 12);
    }
  }
}

void reconnect()
{
  while (!client.connected())
  {
    String clientId = "ESP8266_IR";

    if (client.connect(clientId.c_str()))
    {
      client.subscribe("Infrared_topic");
    }
    else
    {
      delay(6000);
    }
  }
}
Now you need to get the infrared codes from the remote control of the devices.
To do this, we will use the following complex circuit. Arduino Nano and an infrared receiver
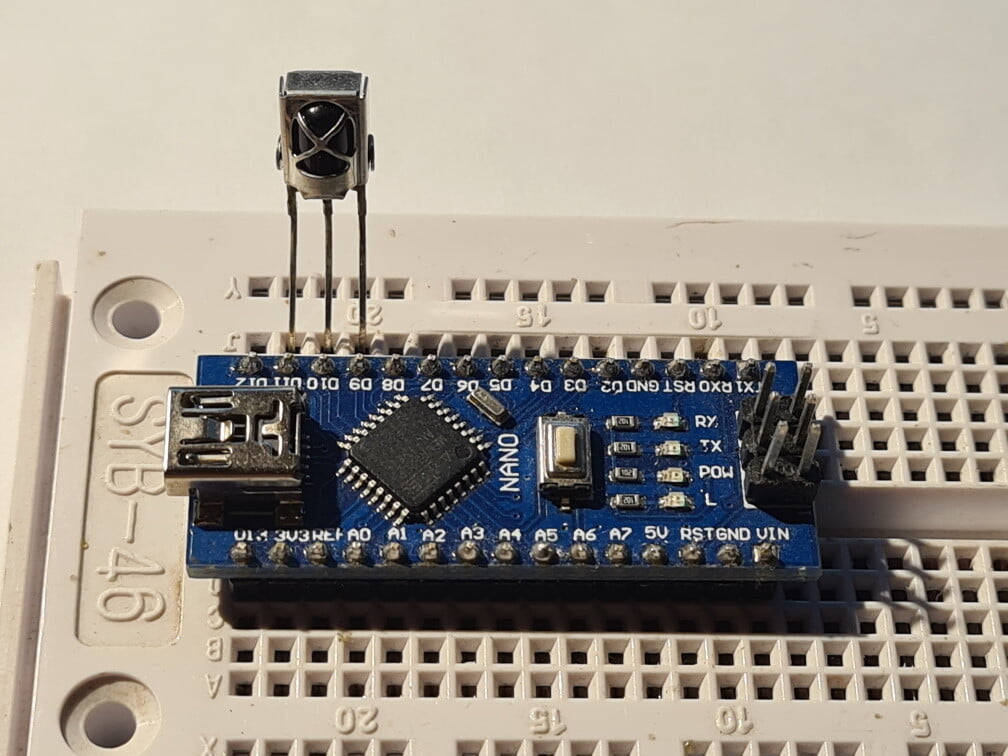
Upload the following code to Nano:
/*    https://myhomethings.eu

 *    IrReceiver pinout:
       ___
      |(X)|   1. pin =>  data -- D11
      |___|   2. pin =>  gnd -- D10
      | | |   3. pin =>  5 V -- D9
      | | |
      1.2.3
*/


#include <IRremote.h>

int recvVcc = 9;
int recvGnd = 10;
int recvPin = 11;

IRrecv irrecv(recvPin);
decode_results results;

void setup()
{
  Serial.begin(9600);
  irrecv.enableIRIn();

  pinMode(recvGnd, OUTPUT);
  pinMode(recvVcc, OUTPUT);
  digitalWrite(recvGnd, LOW);
  digitalWrite(recvVcc, HIGH);
}

void dump(decode_results *results)
{
  int count = results->rawlen;
  if (results->decode_type == UNKNOWN) {
    Serial.print("Unknown encoding: ");
  }
  else if (results->decode_type == NEC) {
    Serial.print("Decoded NEC: ");
  }
  else if (results->decode_type == SONY) {
    Serial.print("Decoded SONY: ");
  }
  else if (results->decode_type == RC5) {
    Serial.print("Decoded RC5: ");
  }
  else if (results->decode_type == RC6) {
    Serial.print("Decoded RC6: ");
  }
  else if (results->decode_type == PANASONIC) {
    Serial.print("Decoded PANASONIC - Address: ");
    Serial.print(results->address, HEX);
    Serial.print(" Value: ");
  }
  else if (results->decode_type == LG) {
    Serial.print("Decoded LG: ");
  }
  else if (results->decode_type == JVC) {
    Serial.print("Decoded JVC: ");
  }
  else if (results->decode_type == AIWA_RC_T501) {
    Serial.print("Decoded AIWA RC T501: ");
  }
  else if (results->decode_type == WHYNTER) {
    Serial.print("Decoded Whynter: ");
  }
  Serial.print(results->value, HEX);

  Serial.println();
}

void loop()
{
  if (irrecv.decode(&results))
  {
    Serial.println(results.value, HEX);
    dump(&results);
    irrecv.resume();
  }
}
When you are ready, start the serial monitor in the Arduino, then press the button on the remote control whose code you want to paste into the NodeMCU ESP8266 sketch. Something like this has to happen:

Here are some more interesting things.


advertising – ESP boards from amazon.com